Part 2: Design a FORM using CSB table return to part 1
Printable interactive form samples - no email response
If you want to print a form instead of emailing, you have two options:
Just make the table with fields and you have it! (scroll down for two samples, or )
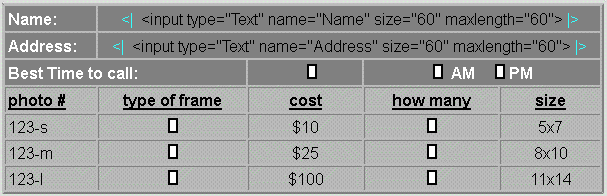
Sample 1:
Name:
|
||||
Address:
|
||||
Best Time to call:
|
AM
PM
|
|||
photo #
|
type of frame
|
cost
|
how many
|
size
|
123-s
|
$10
|
5x7
|
||
123-m
|
$25
|
8x10
|
||
123-l
|
$100
|
11x14
|
||
Sample 2:
Name:
|
|||
Address:
|
|||
Comment:
|
|||
photo #
|
type of frame
|
cost-quantity
|
size
|
123small
|
5x7
|
||
123med
|
8x10
|
||
123large
|
11x14
|
||
BUILD A TABLE THEN
PUT THE FORM FIELDS INTO DIFFERENT CELLS
The image above shows two ways to do it:
This puts the code directly into the table so you can see it in the design window.
If using this method, it must be ALONE on the line/cell and use the passthru codes.
Important: make sure you have no spaces between the passthru codes
The code is inserted and a placeholder image shows in the design window
If inserting the code into Insert> HTML (webgem) DO NOT use the <| |>.
In smaller cells, I find this way works better than passthru technique.
This is the placeholder image I use in tables so it doesn't take up so much space:
Right click it to "save as" to use for HTML your placeholder.
|
THE HTML CODE FOR INPUT FIELDS:
Copy and Paste these codes. Insert one field for each answer needed. Modify for your needs.
Simple text entry:
<input type="Text" name="Name" size="60" maxlength="60">
<input type="Text" name="123-s" size="10" maxlength="10">
<input type="Text" name="small" size="10" maxlength="10">
<input type="Text" name="1" size="10" maxlength="10">
This one allows more input by the user than the field size visible:
<input type="Text" name="Address" size="60" maxlength="200">
|
Simple comment/message entry: (can be seen on the green form below)
<textarea name="Comment" cols="52" rows="10" wrap="VIRTUAL"></textarea>
|
Simple dropdown choice:
<SELECT NAME="123-sFrame" SIZE=1>
<option value=Choose selected>CHOOSE ONE
<option value=Oak-Light>Oak - Light
<option value=Oak-Dark>Oak - Dark
<option value=Cherry>Cherry
<option value=Black>Black metal
<option value=Silver>Silver metal
<option value=Gold>Gold Leaf
<option value=Wedding-crystal>Wedding - Crystal
</SELECT>
Another simple dropdown choice:
<SELECT NAME="123-scost" SIZE=1>
<option value=Choose selected>CHOOSE ONE
<option value=1 = $10>1 = $10
<option value=2 = $20>2 = $20
<option value=3 = $25>3 = $25
<option value=4 = $30>4 = $30
<option value=5 = $35>5 = $35
</SELECT>
Reference Note about the code above:
Purple: the name of the input field.
Choose selected>CHOOSE ONE
Green: this is a one word description that comes back in the email to you
Blue: this word "selected" tells the form that this is the default answer (recommend you put this at the top of the dropdown list on a line that asks visitor to choose.)
Red: This is the word or phrase contained in the dropdown on the form
|
Simple radio dial entry:
<input type="radio" name="MornEve" value="AM"> AM
<input type="radio" name="MornEve" value="PM" checked> PM
Reference Note about the radio dial code:
All choices for this field must be in the same cell to avoid errors.
Green: this word "checked" tells the form that this is the default answer
Purple: this word is typed into the table, not the inserted HTML code
|
OPTIONAL: You can add a print page button to your form
<form action="method">
<INPUT TYPE="button" name="printMe" onClick="print()" value="Print Page"> </form>
|
Click the image to see other forms created using this way
 |
Send me a comment from the form if you like!
|
 |
The forms on this page were first drafts/samples for this site. This black form is the final form in use.
|
 |
Richard has used the same concept of inserting html code into a table to create a printable form.
|
Known limits to this form: NONE.
If you are just printing the form, then there is NO limit on how many fields you can use!
|