Test Index · Table 1 · Table 2 · Table 3 · Table 4 · Table 5 · Resort Table · Background Image in Table · Design a Form! · Folding Menu Tree · Menu Buttons · Hidden Site Map · Anchors · Double Border Detail
THIS PAGE UNDER REVISION TO ADD MORE CHOICES AND REORGANIZE.
(data is correct, just not in a finished format)
|
DESIGN A FORM! How to make or change a FORM for your site
This page will show you how to CUSTOMIZE the look of a form via email from your website.
What would you like to do?
Visitor prints form and completes offline with a pen/pencil/typewriter.
Just build a nice table and give instruction to print and fax.
|
Add a few fields to a basic CSB/Trellix form
for specifics, take a look at KW's website for a tutorial
Customize email web forms
The basic form code created with CSB form wizard has been split into 3 sections and redesigned.
1) Start of form (definition of fields, server and response page statement).
2) End the form with the print/submit/reset buttons to send input in an email to you.
3) Between 1 and 2, build a table in CSB, then put the form fields into it.
You can convert an existing form or use CSB to create the form fields for you then place the code into a customized table so they will match your site. Or just use the sample codes provided below in your table.
|
HOW IT'S DONE:
#1 START THE FORM
(definition of fields, server and response page statement)
Put this code into INSERT >HTML (webgem in Trellix):
<form action="http://csbmail.globalscape.com/cgi-bin/csbmail/csbmail.pl" method="POST" enctype="application/x-www-form-urlencoded"><input type="hidden" name="tlx_SortOrder" value="Name,Address, Time,MornEve,123-sFrame,123-s,123-mFrame,123-m,123-lFrame,123-l"><input type="hidden" name="tlx_FormIndex" value="2"><input type="hidden" name="tlx_OKMessage" value="<br>Your form has been submitted! <br><br><br>Please choose a button to visit another page on our site."><input type="hidden" name="tlx_SendMode" value="1"><input type="hidden" name="tlx_Subject" value="order form from website"><input type="hidden" name="tlx_EmailTo" value="xxxx@emailaddress.com">
|
Each field: unique name, single word with no spaces or symbols (except _ and -)
value="Name,Address, Time,MornEve,123-sFrame,123-s,123-mFrame,123-m,123-lFrame,123-l"
(Name is not the same as name)
(samples are shown below)
1=human readable; 2=comma separated
|
#2 END THE FORM
(the submit/reset buttons to send input in an email)
Put this code into a second INSERT > HTML (webgem in Trellix)
<INPUT TYPE="button" name="printMe" onClick="print()" value="Print Page">
<INPUT TYPE="submit" value="Send" name="tlx_send">
<INPUT TYPE="reset">
</form>
(Note: You can leave out the top line if you do not want to provide a print button like Sample B)
|
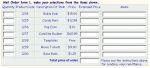
#3 BUILD A TABLE THEN
PUT THE FORM FIELDS INTO DIFFERENT CELLS
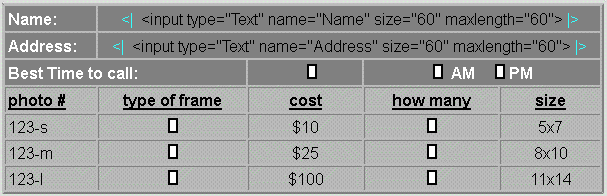
The image above shows two ways to do it:
This puts the code directly into the table so you can see it in the design window.
If using this method, it must be ALONE on the line/cell and use the passthru codes.
Important: make sure you have no spaces between the passthru codes
The code is inserted and a placeholder image shows in the design window
If inserting the code into Insert> HTML (webgem) DO NOT use the <| |>.
In smaller cells, I find this way works better than passthru technique.
This is the placeholder image I use in tables so it doesn't take up so much space:
Right click it to "save as" to use for HTML your placeholder.
|
THE HTML CODE FOR INPUT FIELDS:
To capture the code, press Select All then COPY (Ctrl C) the contents.
Paste (Ctrl V) code into an insert > html (webgem) in your webpage.
Modify the code to suit your form.
BOLD BLACK: This is the NAME OF THE FIELD and must match the name listed in the VALUE LIST.
Simple text entry:
<input type="Text" name="Name" size="60" maxlength="60">
<input type="Text" name="123-s" size="10" maxlength="10">
<input type="Text" name="small" size="10" maxlength="10">
<input type="Text" name="1" size="10" maxlength="10">
This one allows more input by the user than the field size visible:
<input type="Text" name="Address" size="60" maxlength="200">
This one allows you to put a statement in the field so you can make the form thinner. (seen in sample B above) <input name="name" type="text" value="Type your NAME here" onfocus="this.value='';" size="25" maxlength="60">
Reference Note about the code:
Bold Black: the name of the input field.
Blue: this cols number tells how WIDE the input area will be.
Red: this row number tells how many characters can be input.
|
Simple comment/message entry: (can be seen on the green forms above)
<textarea name="Comment" cols="52" rows="10" wrap="VIRTUAL"></textarea>
Reference Note about the code:
Bold Black: the name of the input field.
Blue: this cols number tells how WIDE the input area will be.
Red: this row number tells how TALL the input area will be.
|
Simple topic entry: (can be seen on sample B above)
Reference Note about the code:
Bold Black: the name of the input field.
Choose >CHOOSE ONE
Green: this is a description that comes back in the email to you (no spaces unless you use "" )
Red: this is the word or phrase contained in the dropdown on the form
Gold: set to number of options. I have 4 options.
<select name="topic" size="4" style="font-family: Verdana; font-size:10 px; color:#000000; background: #FFFFFF; color:#000000 ;border: 1 solid #9999CC">
<option value="just trying form">Just Trying Form
<option value="Hello!">Just want to say HELLO!
<option value="suggestion for site">Suggestion for site
<option value="Wandering the web">Wandering the web
<option value="need help, contact please">Need help, contact me please
</option>
|
Simple dropdown choices:
Reference Note about the code:
Bold Black: the name of the input field.
Choose selected>CHOOSE ONE
Green: this is a one word description that comes back in the email to you (no spaces!)
Blue: this word "selected" tells the form that this is the default answer (recommend you put this at the top of the dropdown list on a line that asks visitor to choose.)
Red: this is the word or phrase contained in the dropdown on the form
Simple dropdown choice:
<SELECT NAME="State" SIZE=1>
<option value=CHOOSE selected>CHOOSE ONE
<option value=FL>Florida
<option value=GA>Georgia
<option value=SC>South Carolina
</SELECT>
Another simple dropdown choice:
<SELECT NAME="Heard" SIZE=1>
<option value=heardabout selected>PLEASE CHOOSE ONE
<option value=Google>Google
<option value=Othersearch>Other Search Engine
<option value=CSBforum>CSB Discussion Forum
<option value=TCHforum>TCH Forum
<option value=Other>Some other way
</SELECT>
Another simple dropdown choice:
<SELECT NAME="123-sFrame" SIZE=1>
<option value=Choose selected>CHOOSE ONE
<option value=Oak-Light>Oak - Light
<option value=Oak-Dark>Oak - Dark
<option value=Cherry>Cherry
<option value=Black>Black metal
<option value=Silver>Silver metal
<option value=Gold>Gold Leaf
<option value=Wedding-crystal>Wedding - Crystal
</SELECT>
Another simple dropdown choice:
COMBINE YOUR ANSWER TO AVOID CALCULATIONS IN YOUR FORM!
<SELECT NAME="123-scost" SIZE=1>
<option value=Choose selected>CHOOSE ONE
<option value=1=$10>1 = $10
<option value=2=$20>2 = $20
<option value=3=$25>3 = $25
<option value=4=$30>4 = $30
<option value=5=$35>5 = $35
</SELECT>
|
Simple radio dial entry:
AM
PM
<input type="radio" name="MornEve" value="AM"> AM
<input type="radio" name="MornEve" value="PM" checked> PM
Reference Note about the radio dial code:
All choices for this field must be in the same cell to avoid errors.
Green: this word "checked" tells the form that this is the default answer
Purple: this word is typed into the table, not the inserted HTML code
Red: this is the word or phrase shown on the form
|
Don't use check boxes if possible.
(Empty box can produce errors on some servers, so I did not include the code on purpose)
|
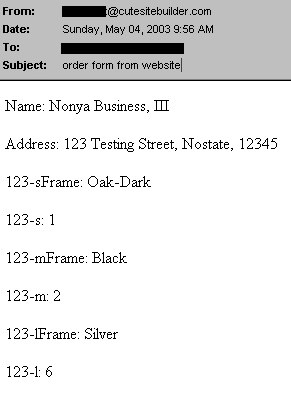
THIS FORM WAS SENT FROM THE WEBSITE
(prior to addition of radio buttons)

AND PRODUCED THIS EMAIL: (radio buttons would give same kind of result)
Standard: Human readable (1)
|
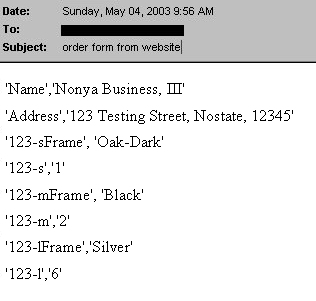
Comma separated response: (2)
|
 |
 |
THE START: begins with: < form ends with: your email address>
place this in a webgem (step 1 in the 1-2-3 method)
FORM FIELDS: the code has table rows <tr> and divisions <td> and <input>
THE END: The buttons to send and reset the form
place this in a webgem (step 2 in the 1-2-3 method)
Example - this table row came from a CSB form. The part you want to use in a separate webgem for a Name field is shown in red bold lettering:
<tr>
<td><font size=-1 face="arial">Name: </font></td><td><font size=-1 face="arial"><input type="Text" name="Name" size="40" maxlength="40"></font></td>
</tr>
(step 3 above gives other examples of input code that can be used.)
|
SEE OTHER FORM SAMPLES
Click the image to see other forms created using the 1-2-3 method
 |
Send me a comment from the form if you like!
|
 |
The forms on this page were first drafts/samples for this site. This black form is the final form in use by a photograher.
(Minor change made so fields could be required)
|
 |
Richard has used the same concept of inserting html code into a table (my step 3) to create a printable form. Just leave out the top and bottom code that sends the form via email! Info here.
|
Known limits to this form and any forms run on the Globalscape server:
Need to require fields? The CSB and Trellix code does not include this option, but it can be easily added and still use the same server! 1-2-3 method and adding the code shown here will allow you to require text fields.
Capable up to 20 fields. If you are just printing the form, then there is NO limit on how many fields you can use!
Want to use another company (third party) to handle the processing of the form?
Often these allow more fields and other options.
Fine. Replace code #1 to send the form to the proper place (get the code from your form processor) and keep the rest intact unless you need to add something for required field.
Here's an active form for a photographer. The samples on this page were first drafts for his form.
123 method used to make the form with CutnPaste server information in the 1st start the form code: red altered.
|
|
My personal contact form is seen through an iFrame.
(Unlike the ones on this page, it is a live real form that is used to contact me.)
My iframe code on the contact page, which cuts a window in the page (and shows the form page)
<iframe name="FRAME1" src="id68.htm" width="345" height="438" frameborder="0" scrolling="no" >
SAMPLE B (small skinny form shown above would work well for this project!)
|