Test Index   ·   Photo Borders   ·   Table of sliced images - Rounded corners   ·   Sliced images and manually linked   ·   Overlap Images   ·   Create a Watermark   ·   Gif Png Transparency   ·   Buttons-Image Links   ·   Image Names   ·   Image Theft   ·   Lake Applet   ·   Other applets   ·   Slideshow1   ·   Slideshow2   ·   Slideshow3   ·   Galleries   ·   DD Thumbnail Viewer   ·   image map   ·   xara thumbnail   ·   Random Image   ·   LOGO BRANDING   ·   Animated Image   ·   photo with sound


Lake:  moving water on static image
 ALERT!!   Windows XP SP2
<<<<  makes these Lake applets look like this
Since Microsoft XP released Service Pack 2, the Lake.class applet will not work correctly!

To avoid the problem, STOP USING the
Lake.class file and begin using the newer
lake.class file that is available here:

In the instructions below, replace the Lake with lake!

(The lowercase letter and the newer class file really matter!)

Instructions included with these:

More moving water examples:
TEST 1: Original Lake and variations
TEST 2: Liberty boat of sailors coming to shore
(with intricate large overlay)

NOTE: this page will take some time to load!

(these have visual only no detail instructions)

[Applet:  Lake]

TEST 1: Lake (original)  

This test sample is an updated version and several variations of KW's Tutorial #13 shown here:  Tutorial List

Credits: David Griffiths wrote the applet and
Kevin Weilbacher modified the code
that goes with it to work in Trellix/CSB.


IMPORTANT: The Lake.class offered on Java Script Kit site will not work with this set of instructions.  Here is the correct version:
(update: see Windows XP SP2 notice above before downloading. Recommend the other file!)

Download image here:  
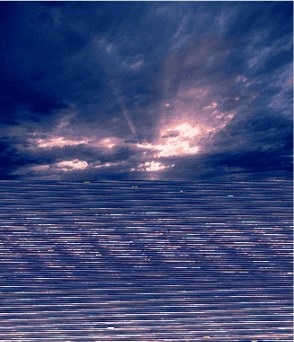


If you have Windows XP and can only see a GRAY BOX instead of images:

Microsoft did not ship the Java Virtual Machine (needed for running the applets, not Javascript) with early copies of Windows XP.  The program is free and easily installed and enabled.  Download  Java at :


Take a plain image:
dusk

And transform it into:
 Important note:  This tutorial was originally made with Lake.class not lake.class!  The capital L matters!


This is a sample of David Griffith's original code:
<applet code=Lake.class id=Lake width=392 height=380 >
<param name=image value="dusk.gif">
<param name=href value="http://www.javascriptkit.com">
</applet>

NOTE: if you are NOT using CSB or TRELLIX to build your site:
1. Adjust your image size as discussed in step 1 below
2. Use the code ABOVE instead of the code shown in step 2, just changing the image size and name.
3. FTP your image and class file to your site.  
4. Publish.


1. Adjust image size:  
Use a photo program to check pixel size.  Width stays the same.
Height of image increased: multiply by 1.9     Ex: height is 199   199 x 1.9 = 378.1 = rounded to 380 pixels
Use your calculated height in the inserted HTML code
CSB User: Insert > HTML is same as Trellix Webgem!
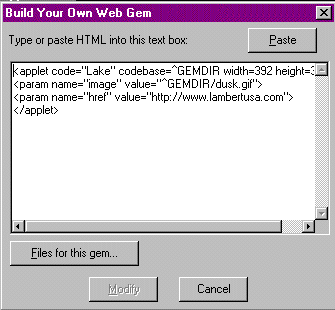
2. Insert the code: into Webgem (Insert > HTML)
CSB User: still use ^GEMDIR in code!

<applet code="Lake" codebase=^GEMDIR width=392 height=380>
<param name="image" value="^GEMDIR/dusk.gif">
<param name="href" value="http://www.lambertusa.com">
</applet>
NOTE: Items in red are changed to match yours
(not using CSB or Trellix to build your site?  read this)
CSB User: Files for this component is same as Gem Files!
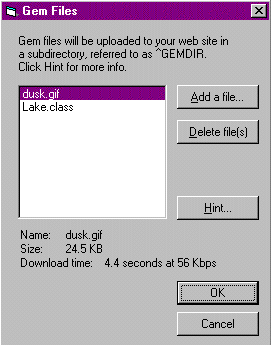
3. Insert both files into Gem files (Webcomponent)
Make sure capitalization is same as you used in the code (step 2)!   This step eliminates the need to FTP your files to your site!  

4. Publish!
NOTE: if using frames, the link will load in current frame unless you add:
<param name="target" value="_top">      (added to variation 2)

or  to open in a new window, add:
<param name="target" value="_blank">     (added to variation 3)

VARIATION 1: add a border


Add items in blue for a tight border around image:

<center><table border=5 cellspacing=0 cellpadding=0><tr><td>
<applet code="Lake" codebase=^GEMDIR width=392 height=380>
<param name="image" value="^GEMDIR/dusk.gif">
<param name="href" value="http://www.lambertusa.com">
</applet></td></tr></table></center>

NOTE: Items in red are changed to match yours

VARIATION 2: smaller image overlay
This would be great for a logo or text- overlay must be gif with transparency


Add items in blue for a tight border around image
& item in red allows you to add an image on top of the original picture
& item in light blue breaks frame on link:

<center><table border=7 cellspacing=0 cellpadding=0><tr><td>
<applet code="Lake" codebase=^GEMDIR width=392 height=380>
<param name="image" value="^GEMDIR/dusk.gif">
<param name="overlay" value="^GEMDIR/grumpy.gif">
<param name="target" value="_top">  
<param name="href" value="http://www.lambertusa.com">
</applet></td></tr></table></center>

NOTE: Items in red are changed to match yours

grumpy.gif image is 100 x 95 pixels and automatically centers on overlay


VARIATION 3: large image overlay
Use for a view through (trees, window, stateroom window on boat, etc)
overlay image must be gif with transparency


item in red allows you to add an image on top of the original picture
& item in light blue opens into a new window on link:

<applet code="Lake" codebase=^GEMDIR width=392 height=380>
<param name="image" value="^GEMDIR/dusk.gif">
<param name="target" value="_blank">  
<param name="href" value="http://www.lambertusa.com">
<param name="overlay" value="^GEMDIR/seagrapes.gif">
</applet>
NOTE: Items in red are changed to match yours

seagrapes.gif image is 392 x 395 pixels and automatically centers on overlay

overlay image:  The seagrape leaves were manually cut out of another image, placed into a transparent image which was expanded longer than the overall applet so all edges would be covered, other wise top edge of dusk would show above seagrapes.  Done through the trial and error method tweaking until the final image was satisfactory.)
Enjoy!


REFERENCE AND COMPARISON:
Image source:  dusk.gif (Javascript Kit with DG's code below)
NOT AVAILABLE FOR DOWNLOAD: (for example only)
grumpy.gif (Samantha Conway) - used in various forms on Lambert website
seagrapes.gif  (Samantha Conway) - photo taken in the Keys and trimmed using Paint Shop Pro
This is a sample of David Griffith's code:
<applet code=Lake.class id=Lake width=392 height=380 >
<param name=image value="dusk.gif">
<param name=href value="http://www.javascriptkit.com">
</applet>

NOTE:  if you are NOT using CSB or TRELLIX to build your site, use his code, and FTP your image and class file to your site!
This is what the code looks like with KW's modifications for use in CSB/Trellix:
<applet code="Lake" codebase=^GEMDIR width=392 height=380>
<param name="image" value="^GEMDIR/dusk.gif">
<param name="href" value="http://www.lambertusa.com">
</applet>


 Test 2: another large image overlay
Use any photo and add/replace water!

"Liberty"
Just the background (top) of image and water:

Full image with boat overlay:


And to really feel like you are on the boat taking you to shore, add a rocking motion.
Hope you don't get seasick.  

The applet will not allow control the height of the swells.
(There is another applet that allows the waves to be adjusted, but not the rocking motion)
This technique would work better on a stormy shot with waves.


Click either animated images to go to the site dedicated to USS Rankin (AKA-103)

Here's the original photo used with permission for this tutorial:
original liberty photo with scratches and wear


HOW IT WAS DONE:

Clean/restore your photo if damaged.  Note the original shot I made the sample from has damage.  Before the project, clean the image to the best of your ability.
JPG and gif images work the best for this technique so if your image is a tif, bmp, etc File Save As to convert to a jpg.  If possible, optimize your image quality so the image is compressed but clear, this makes the image as small as you can make it before we start the project. (note: some photo programs refer to optimize as make the image web-ready)
Make 2 duplicate copies.  We will be changing the photo so put the original someplace that you can not mistake it for the project images.
Image 1: Take the full photo and cut it off (crop it) at the new water line.  Even if your image has no water line, where ever you cut horizontally will create a waters edge.
liberty crop top
Our Image1 is not ready to make water yet.  Anything that will overlap from the background image to the  foreground image must be taken out.  In this example, the metal frame showing above can not stay in Image 1.  It must be removed, and any area that it covers must be filled.
liberty crop top - replace pixels
The metal frame has been removed and the image now has a complete scene.  
Because the original image was strong in the foreground, but the background had such weak tones, I adjusted the colors to provide a better reflection in the water.  Image 1should be saved only in a jpg format and is now  complete.

Image2:  Leave the photo full size.   Since we need transparency on this image, File Save As to make it a gif (the applet does not recognize png). This step is just opposite from Image 1.  This time you will remove all parts of the image that are not going to be in the foreground overlay.  (At least this time you only remove, no replacing!)
liberty clear background - keep foreground image only

You are ready for the application onto the Image 1.  Note.  You may not be done with this image.  It may need some tweaking before you are satisfied with the result.
Follow the same instructions as shown in the LAKE example above, modify the HTML code to fit your image dimensions, load the Lake.class and images into an Insert HTML (webgem in Trellix) and publish your page. Study it for problems.

When I overlaid this image I found 2 things wrong:
1. the overlay image came up to high on the mountain.  I made the image CANVAS larger (not the picture).  For purposes of this web page, I added a slight border so you can see the full size of the expanded image.  The area at the top is actually empty canvas but shows up better on this demo if colored.  By adding extra space at the top of the photo, the boat will hit the the background image approximately the same height as the original photo.  This is not an exact science and must be adjusted according to the photo you are using. It took me two tries to get it the way I wanted.
liberty forefround expanded   
I filled in the space with the color that represents transparent. (need help with transparency, check out this tutorial)
2. The edges on the boat seemed to rough, jagged when placed as an overlay.  I went back to the now expanded photograph and cleaned/recolored pixels so they would not be shiny against the background areas.  The resulting tweaks are shown below, the image was saved to a new name each time I adjusted:  (hard to see difference unless laid against the background image)
liberty foreground expanded and filled
I double clicked my inserted HTML code placeholder (I use the original pic as mine) changed the code to the new picture name, added the new tweaked image to the webcomponent and republished.  
This step may be done a few times to get the image where, and how you want it.  Personal choice.
Depends on how picky you are and how difficult the background/foreground image is to work with.

Liberty Image Specifications
Orig photo:  
Image 1:  top
water dimension:
Image 2: foreground
width:
 512
512
512
512
height:
 350
163
 320 *
400 (expanded)
size:
 51 KB
17
-
60
jpg/gif:
jpg
jpg
applet
gif
solid/transparent:
solid
solid
-
transparent
*Note: the calculation for how large the water is basically 163 x 1.9= 310
But this can be adjusted to have more water by adding a few pixels (I added 10 for a bit more water)  

Final code used for the Liberty:
<center><table border=7 cellspacing=0 cellpadding=0><tr><td>
<applet code="Lake" codebase=^GEMDIR width=512 height=320>
<param name="image" value="^GEMDIR/liberty1og.jpg">
<param name="overlay" value="^GEMDIR/liberty2ocm400tf.gif">
<param name="href" value="http://www.ussrankin.org/">
<param name="target" value="_blank">
</applet></td></tr></table></center>

For rocking motion, add before </applet>:   <param name="rock" value="on">
(Also, applet size was adjusted to the following: w= 512, h=280 because the swells push the overlay image causing a gray edge to appear.  This is trial and error till you get the result you want.)

(not as dramatic as the liberty boat, but the second is pretty good)