Test Index · Table 1 · Table 2 · Table 3 · Table 4 · Table 5 · Table Firefox · table css · Layered Tables · Resort Table · Background Image in Table · Selection Guides · Folding Menu Tree · Menu Buttons · Hidden Site Map · Anchors · Double Border Detail
Background Image in Table using CODE
NOTE: The background image in the table WILL repeat to the right and down
if your text goes to wide, or long vertically.
The trick to this technique is to contain the words within the image!
Using non-repeat code combined with this technique does not work.
Or use a very small image and purposely allow it to repeat inside the table!
|
EXAMPLE 1
|
The links inside these tables are static.
They stay the same as you mouse moved over them.
The same table with no image-less impact:
|
EXAMPLE 2
|
The links inside these tables are rollover links.
They change as you mouse moved over them
The same table with no image-less impact:
|
EXAMPLE 3
You can place just plain text in a table that has an image background. It does not have to be linked to anything!
This is nice as a special item you want to show well.
|
|
EXAMPLE 4
The links inside these tables are rollover links.
They change as you mouse moved over them
This is nice as a special item you want to show well.
3 layered tables in this sample:
1 - outside border with white colored background
2 - dark sea blue parchment shaded background
(small image tiling/repeating inside the table)
3 - watermarked horse image background
NOTE: this technique can be done without text and links! See notes on the code!
|
|
EXAMPLE 5
The links inside these tables are rollover buttons.
They change as you mouse moved over them.
This is nice as a special item you want to show well.
3 layered tables in this sample:
1 - outside border with white colored background
2 - dark sea blue parchment shaded background
(small image tiling/repeating inside the table)
3 - watermarked horse image background
|
|
NOTE: Create a watermark image easily in a photo program by adjusting the brightness/contrast setting or using the Layer opacity setting. See an example of the Layer opacity setting in PSP on bottom of this page.
with no frames and borders on (tiled small image for color block, tiled logo, double image for wider table)
(The 5 samples on this page are also shown in the background section, on a page with a textured background for higher contrast)
|
EXAMPLE 1 CODE
To capture the code, press Select All then COPY the contents.
MUST change each gEMDIR to GEMDIR before using code!
I have made notes in code below and it will effect functionality!
Use the Select All choice above!
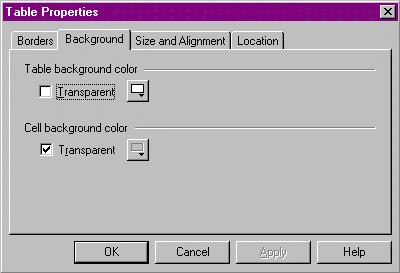
Make a table in CSB. Set the cell spacing and the padding to 0.
Place this script into an Insert > HTML (webgem in Trellix) inside the table.
Center the webgem. Include the image in the webcomponent.
Change BLUE items to your image name and size.
Change NAVY items to match your font colors and sizes.
Change RED items to match your links.
<table background="^GEMDIR/baypjumpweavefade2.png" border="0" cellpadding="6" cellspacing="2" width="244" height="323">
<tr>
<tD VALIGN=TOP HEIGHT= 112 >
<NOBR>
<FONT SIZE="3" COLOR="#330099"><B>RIDING FACILITIES in the area:</B></FONT>
<bR>
<bR>
<bR>
<bR>
<bR>
<bR>
<bR>
<bR>
<bR>
<bR>
<bR>
<bR>
<FONT SIZE="2" COLOR="#330099">
<div><A HREF="id16.htm" TARGET="_top" TITLE="message"><U><B>The Funny Farm</B></U></A></div>
<div><A HREF="id16.htm" TARGET="_top" TITLE="comment"><U><B>Standards and Hedges</B></U></A></div>
<div><A HREF="id16.htm" TARGET="_top" TITLE="tagline"><U><B>Lessons with Midge</B></U></A></div>
<div><A HREF="id16.htm" TARGET="_top" TITLE="any words"><U><B>The Stable Ones</B></U></A></div>
</FONT>
</NOBR>
</td>
</tr>
</table>
|
EXAMPLE 2 CODE
Capture both codes here: press Select All then COPY the contents
MUST change each gEMDIR to GEMDIR before using code!
I have made notes in codes below and it will effect functionality!
Use the Select All choice above!
Two steps:
1) Place the first script in an Insert > HTML (webgem in Trellix):
Change NAVY items to match your font colors and sizes.
This first code says how the links will look regular and on rollover (hover).
I have underline turned off, text bolded and change to CAPS (uppercase) on rollover.
The colors I use in the sample are blue with a change to green on rollover.
<!-- This script and many more are available free online at -->
<!-- The JavaScript Source!! http://javascript.internet.com -->
<!-- Original: Martial Boissonneault -->
<!-- Web Site: http://getElementById.com -->
<style type="text/css">
.menulinks {position:relative;}
#menucont2 a{color:#000080; font-weight:bold; text-decoration:none;}
#menucont2 a:hover{color:#006400; font-weight:bold; text-decoration:none; text-transform: uppercase;}
</style>
2) Make a table in CSB. Set the cell spacing and the padding to 0.
Place the second script into an Insert > HTML (webgem in Trellix) inside the table.
Center the webgem. Include the image in the webcomponent.
Change BLUE items to your image name and size.
Change NAVY items to match your font colors and sizes.
Change RED items to match your links.
<table background="^GEMDIR/baypjumpweavefade2.png" border="0" cellpadding="6" cellspacing="2" width="244" height="323">
<tr>
<tD VALIGN=TOP HEIGHT= 112 >
<NOBR>
<FONT SIZE="3" COLOR="#330099"><B>RIDING FACILITIES in the area:</B></FONT>
<bR>
<bR>
<bR>
<bR>
<bR>
<bR>
<bR>
<bR>
<bR>
<bR>
<bR>
<bR>
<div id="menucont2">
<a href="id16.htm" TARGET="_top" TITLE="A fun place to ride!" id="a1" class="menulinks">The Funny Farm</a><br>
<a href="id16.htm" TARGET="_top" TITLE="Lessons!!" id="a2" class="menulinks">Standards and Hedges</a><br>
<a href="id16.htm" TARGET="_top" TITLE="Watch for that whip!" id="a3" class="menulinks">Lessons with Midge</a><br>
<a href="id16.htm" TARGET="_top" TITLE="Board and lessons here!" id="a4" class="menulinks">The Stable Ones</a><br>
</div>
</NOBR>
</td>
</tr>
</table>
|
EXAMPLE 3 CODE
To capture the code, press Select All then COPY the contents.
MUST change each gEMDIR to GEMDIR before using code!
I have made notes in code below and it will effect functionality!
Use the Select All choice above!
Make a table in CSB. Set the cell spacing and the padding to 0.
Place this script into an Insert > HTML (webgem in Trellix) inside the table.
Center the webgem. Include the image in the webcomponent.
Change BLUE items to your image name and size.
Change NAVY items to match your font colors and sizes.
Change RED items to match your text.
<table background="^GEMDIR/baypjumpweavefade2.png" border="0" cellpadding="6" cellspacing="2" width="244" height="323">
<tr>
<tD VALIGN=TOP HEIGHT= 112 >
<bR>
<div>
<FONT SIZE="4" COLOR="#006400" FACE="Arial,Helvetica,sans-serif"><CENTER><B>SPECIAL OPPORTUNITY!</B></CENTER></FONT></div>
<bR>
<bR>
<bR>
<bR>
<bR>
<bR>
<FONT SIZE="2" COLOR="#006400" FACE="Arial,Helvetica,sans-serif">
<div>
<CENTER><B>You can place just plain text in a table that has an image background. It does not have to be linked to anything!</B></CENTER></div>
<bR>
<bR>
<div>
<CENTER><B>This is nice as a special item you want to show well.</B></CENTER></div>
</FONT>
</td>
</tr>
</table>
|
EXAMPLE 4 CODE - THREE LAYERS
Capture both codes here: press Select All then COPY the contents
MUST change each gEMDIR to GEMDIR before using code!
I have made notes in codes below and it will effect functionality!
Use the Select All choice above to copy code!
Three steps:
1) SKIP THIS STEP IF YOU DO NOT WANT LINKS ON THE IMAGE!
Place the first script in an Insert > HTML (webgem in Trellix):
Change NAVY items to match your font colors and sizes.
This first code says how the links will look regular and on rollover (hover).
I have underline turned off, text bolded and change to CAPS (uppercase) on rollover.
The colors I use in the sample are blue with a change to green on rollover.
<!-- This script and many more are available free online at -->
<!-- The JavaScript Source!! http://javascript.internet.com -->
<!-- Original: Martial Boissonneault -->
<!-- Web Site: http://getElementById.com -->
<style type="text/css">
.menulinks {position:relative;}
#menucont2 a{color:#000080; font-weight:bold; text-decoration:none;}
#menucont2 a:hover{color:#006400; font-weight:bold; text-decoration:none; text-transform: uppercase;}
</style>
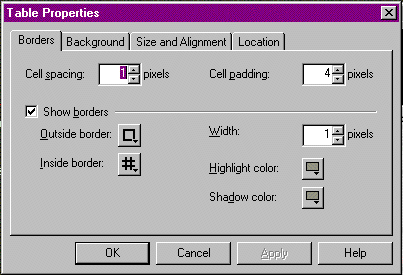
2) Make a table in CSB. Set the cell spacing to 1 and the padding to 4.
3) Place the second script which makes the second and third layers into an Insert > HTML (webgem in Trellix)
inside the first layer table made in step 2.\
Center the webgem.
Include the images for the 2nd and 3rd layers in the webcomponent.
Change GREEN items to the colors of the 2nd layer border (I used blue tones #000080)
Change GREEN items to your image name and size for the 2nd Layer. Set table and image to same size.
Note: The blue background image is only a small block, but setting the image size stretches it to fill the large table.
You have to know the innermost image size (my horse picture) that is used in the 3rd layer to calculate the 2nd layer.
I defined the table as 330x409 so the blue border would be 43 pixels wider on each side than the inside image (horse):
2nd table calculation: take the 3rd table image (inside image) 244 wide+ 43 left side + 43 right side = 330 wide
2nd table calculation: take the 3rd table image (inside image) 323 wide+ 43 top side + 43 bottom side = 409 high
Change BLUE items to your image name and size for the 3rd Layer. (Note: my horse image is 244 x 323)
Change NAVY items to match your font colors and sizes for text.
Change RED items to match your links.
Add or remove <bR> to push text down or move it up.
Want the picture with no links or text? Just leave out the code bracketed with START STOP notes!
<table border="2" bordercolordark="#000080" bordercolor="#000080" bordercolorlight="#000080" cellpadding="1" cellspacing="1" width="330" height="409">
<tr>
<td align="center" background="^GEMDIR/dkseablueparchment.jpg" valign="Middle" width="330" height="409">
<p align=center>
<table background="^GEMDIR/baypjumpweavefade2.png" border="0" cellpadding="6" cellspacing="2" width="244" height="323">
<tr>
<tD VALIGN=TOP HEIGHT= 112 >
<NOBR>
<div>
<!-- START If you do not want text or links on the image, remove this section ! -->
<FONT SIZE="3" COLOR="#330099"><B>RIDING FACILITIES in the area:</B></FONT>
<bR>
<bR>
<bR>
<bR>
<bR>
<bR>
<bR>
<bR>
<bR>
<bR>
<bR>
<bR>
<div id="menucont2">
<a href="id16.htm" TARGET="_top" TITLE="A fun place to ride!" id="a1" class="menulinks">The Funny Farm</a><br>
<a href="id16.htm" TARGET="_top" TITLE="Lessons!!" id="a2" class="menulinks">Standards and Hedges</a><br>
<a href="id16.htm" TARGET="_top" TITLE="Watch for that whip!" id="a3" class="menulinks">Lessons with Midge</a><br>
<a href="id16.htm" TARGET="_top" TITLE="Board and lessons here!" id="a4" class="menulinks">The Stable Ones</a><br>
</div>
<!--STOP-->
</NOBR>
</td>
</tr>
</table>
</p>
</td>
</tr>
</table>
|
EXAMPLE 5 CODE - THREE LAYERS & BUTTONS
Capture both codes here: press Select All then COPY the contents
MUST change each gEMDIR to GEMDIR before using code!
I have made notes in codes below and it will effect functionality!
Use the Select All choice above to copy code!
Three steps:
1) Place the first script in an Insert > HTML (webgem in Trellix):
Change items to match your font colors and sizes.
This first code says how the buttons will look regular and on rollover (hover).
The colors I use in the sample are blue with a change to green on rollover.
<STYLE type=text/css>
#rollbutton1 a {
color: #C0DCC0;
font-family:verdana;
font-size:10px;
font-weight: bold;
text-decoration: none;
border:2px outset light gray;
background-color:#445277;
width: 160px;
height: 26px;
padding: 3px;
margin: 0px;
}
#rollbutton1 a:hover {
background-color: #C0DCC0;
color:#445277;
padding-left: 3px;
border:2px inset light gray;
}
</STYLE>
2) Make a table in CSB. Set the cell spacing to 1 and the padding to 4.
3) Place the second script which makes the second and third layers into an Insert > HTML (webgem in Trellix)
inside the first layer table made in step 2.\
Center the webgem.
Include the images for the 2nd and 3rd layers in the webcomponent.
Change GREEN items to the colors of the 2nd layer border (I used blue tones #000080)
Change GREEN items to your image name and size for the 2nd Layer. Set table and image to same size.
Note: The blue background image is only a small block, but setting the image size stretches it to fill the large table.
You have to know the innermost image size (my horse picture) that is used in the 3rd layer to calculate the 2nd layer.
I defined the table as 330x409 so the blue border would be 43 pixels wider on each side than the inside image (horse):
2nd table calculation: take the 3rd table image (inside image) 244 wide+ 43 left side + 43 right side = 330 wide
2nd table calculation: take the 3rd table image (inside image) 323 wide+ 43 top side + 43 bottom side = 409 high
Change BLUE items to your image name and size for the 3rd Layer. (Note: my horse image is 244 x 323)
Change NAVY items to match your font colors and sizes for text.
Change RED items to match your links.
Add or remove <bR> to push text down or move it up.
<table border="2" bordercolordark="#000080" bordercolor="#000080" bordercolorlight="#000080" cellpadding="1" cellspacing="1" width="330" height="409">
<tr>
<td align="center" background="^GEMDIR/dkseablueparchment.jpg" valign="Middle" width="330" height="409">
<p align=center>
<table background="^GEMDIR/baypjumpweavefade2.png" border="0" cellpadding="6" cellspacing="2" width="244" height="323">
<tr>
<tD VALIGN=TOP HEIGHT= 112 >
<NOBR>
<div>
<FONT SIZE="3" COLOR="#330099"><B>Rollover Buttons on a Photo</B>
</FONT>
</div>
<bR>
<bR>
<bR>
<bR>
<bR>
<bR>
<bR>
<bR>
<bR>
<bR>
<DIV id=rollbutton1 align="center">
<A href="../test-csb" onfocus="this.blur()"><center>Test Area 1:<br>Tables-Buttons</center></A><br>
<A href="../test-csb2nf" target="_blank" onfocus="this.blur()"><center>Test Area 2:<br>Iframes-Links-Arrowhead</center></A><br>
<A href="../photo" onfocus="this.blur()"><center>Work with Photos<br>Galleries-Applets-etc</center></A><br>
</div>
</NOBR>
</td>
</tr>
</table>
</p>
</td>
</tr>
</table>
|