Sami's Site: CSB - Trellix Support and Tests
|
Test Index · CSB4 Rollover Links · Link Styles 1 · Link Styles 2 · Link Styles 3 · iFrame Tutorial - IFrames described in detail! · Form sample in iFrame · Arrowhead · Excel · Color Blind · Websafe Fonts and tests · Make an Alert Box · Webgem Placeholder Images · LINK HOVER TOOLTIP · OverLIB tooltip · Disguise Email · Quote of the Month · Map to your location! · Link Border Test · FORUM
iFrame Tutorial - IFrames described in detail!
Inline Frames (IFrames) are windows cut into your webpage that allow your visitor to view another page on your site or off your site without reloading the entire page.
Put a linkable or scrolling iFrame window in your website today.
IFRAME EXAMPLES:
The table below actually demonstrates 2 different types of iFrames at the same time!
1. SCROLLING IFRAME: scrolling content, only one page viewable
2. STATIC IFRAME: static (no scrolling movement), links change content.
|

STATIC IFRAME EXAMPLE WINDOW: "FRAME1"
pages in the window above
|
|
The links above are outside the iframe but change the content of the iframe. See Step 2 below for code.
|
STATIC IFRAME EXAMPLE WINDOW: "FRAME2" - CHANGE SCROLL BAR COLORS
Works in Internet Explorer but not in Firefox.
STATIC IFRAME EXAMPLE WINDOWS: DOUBLE Iframes
"FRAME3"
|
"FRAME4"
|
(These two static iframes are borderless and the color of the content pages matches the table so they are invisible. Click links in one iframe, open in second iframe)
|
|
STATIC "FRAME5" - TEST FORM (survey)
Upon submit, the iframe fills with a simple response notice. No redirect page used.
No email generated. No stats shown. Just a way to collect data.
I do not use or sell your email address. The information is used for demo purpose only.
Try FRAME8 to get a link to the instructions!
STATIC "FRAME6" - TEST FORM.
Upon submit, the iframe fills with the redirect response page, leaving the rest of this web page intact.
Email is sent to webmaster and copy to you too
I do not use or sell your email address. The information is used for demo purpose only.
Try the form, to get a link to the instructions! Scroll down to see code below. made with PHP FormMail Generator.
STATIC "FRAME7" - TEST LINKS INSIDE THE IFRAME.
Setting TARGET in link code determines where link opens!
STATIC "FRAME8" - THIS IFRAME HAS WIDE BORDER

|
GENERAL STATIC IFRAME INSTRUCTIONS:
STEP 1: CREATE AN IFRAME
You name the iframe, you define the size and you say what page you want to display. You can also define if you want a border, scrollbars or transparency, but those are not absolutely necessary. Each iframe needs a unique name.
On this page, I use eight names: FRAME1, FRAME2, FRAME3, FRAME4, FRAME5, FRAME6, FRAME7, FRAME8.
FRAME1: borderless, shown in table above
(Table settings for reference: width: 740, height: 362 width includes room for scrollbar.)
<iframe name="FRAME1" src="id77.htm" width="730" height="360" frameborder="0" ></iframe>
FRAME2: with 3-d border, shown above with no table
<iframe name="FRAME2" src="static2.htm" width="500" height="280" frameborder="1" ></iframe>
FRAME8: form placed inside the invisible iframe!
<iframe name="FRAME8" frameborder="0" src="/contact/form.php" allowTransparency="true" width="340" height="490"></iframe>
Understanding the basic iFrame code:
|
||
<iframe name="FRAMENAME" src="contentpage.htm" width="100" height="280" ></iframe>
<iframe name="FRAMENAME" src="contentpage.htm" width="100" height="280" frameborder="0" ></iframe>
<iframe name="FRAMENAME" src="contentpage.htm" width="450" height="310" style="border: 10px solid #0415FB" ></iframe>
<iframe name="FRAMENAME" src="contentpage.htm" width="100" height="280" frameborder="1" ></iframe>
This code adds code to force no scroll bar and to allow transparency (but does require 2nd code to make it work. Scroll down to see more about this.)
<iframe name="FRAMENAME" src="contentpage.htm" width="100" height="280" frameborder="1" scrolling="no" allowautotransparency=true></iframe>
|
||
Code attributes:
|
Used in samples:
|
What is it?
|
name
|
FRAME1
FRAME2
FRAME3
FRAME4
FRAME5
FRAME6
FRAME7
FRAME8
|
Name of the frame (call it anything you want)
No spaces, no symbols except - and _
Multiple iframes: each iFrame needs a different name
I numbered the frames on this page.
NAME is valid for HTML 5.
XTML note: NAME is depreciated in XHTML, use ID instead.
|
src
|
id77.htm
static 2.htm
special1.htm
special2.htm
cb.htm
http://www.google.com
frame4blank.htm
frame4spaz.htm
frame4si.htm
frame4oscar.htm
|
Address of the Contents page that you want to see in the iframe (This is the other page seen through the iframe window when you load the page.)
The iframe will begin by displaying this page through the window.
If you want to see a blank box until you click a link, use about:blank as your address.
Better choice: start with a basic page with an introduction, etc
|
width
|
740
40%
|
Wide: Enter number of pixels for the window
Or enter the percentage for the window size
|
height
|
360
60%
|
High: Enter number of pixels for the window
Or enter the percentage for the window size
|
frameborder
|
1 = show a 3d edge
0 = no border
|
3d edge on the iFrame window (higher number = wider border)
Using 0 makes the edge invisible.
Default iframe has 3d edge on.
same as frameborder = "1"
If you want the border, you can leave out frameborder attribute from code.
If no border is used, you must define
frameborder = "0"
HTML 5: see seamless. at this time, frameborder will not be supported
|
seamless
|
seamless
|
This attribute should cause the content of the iframe to blend with the iframe web page (parent document)
to have no borders or scrollbars.
seamless="seamless" will replace frameborder ="0"
NOTE: Links inside the iframe: If seamless is used, the target of links will be set to "_parent" replacing entire page, unless otherwise specified.
NEW in HTML 5 replaces frameborder
(My tests with it show it does not work yet....April, 2011)
|
scrolling
|
auto = browser decides
yes = always have
no = do not show
|
Scroll bar: if your content page is too long or wide to fit into the iFrame, then scroll bars appear automatically as needed, even without the scrolling="auto" code!
Adding scrolling="no" to your code will stop the scroll bar from showing. But be careful! If you have content outside the window, your visitor will not be able to see it.
Not supported in HTML 5
|
rel
|
nofollow
|
Not recommended at this time. This is a statement that is discussed on many forums to stop search engines from leaving the current page to go to the content page. This is a LINK option and is not related to iframes so it will not have the desired effect at this time.
|
Transparent iframe codes: (must use both!)
|
see transparent iframe demonstration and tutorial HERE
|
|
allowtransparency true
<style type="text/css">
body {background-color: transparent}
</style>
|
This is the first part of the code. Put into the iframe code
This is the second part of the code. Put at the top of each content page you want to see through. Must use both codes! If this code is not placed on the content page, the iframe will be solid even though you allowed transparency.
|
|
Other iframe settings you can choose to use though I have no samples made with them:
<iframe name="FRAMENAME" src="contentpage.htm" width="100" height="280" frameborder="0" scrolling="no" hspace=10 vspace=5 ></iframe>
|
||
hspace
vspace
|
10
5
|
External Space AROUND the iframe.
Adust the hspace (horizontal-space on right and left) or
vspace (vertical-space above and below the iframe.
Not supported in HTML 5
|
<body topmargin=10 leftmargin=5>
|
Internal Space WITHIN the iframe. This code is placed into the body of the content page to adjust the margin within the iframe. On FRAME 5 sample, I set the margins to 0.
In CSB, use Insert> HTML to place the code.
Not supported in HTML 5
|
|
STEP 2: CREATE LINKS TO CHANGE THE CONTENT
NOTES: Scrolling iframes using the code discussed in the table above will not allow linking!
The links demonstrated below are for FRAME1.
The target is the NAME OF THE FRAME where you want the link to open.
On this page, I use five names, but all the sample codes use just one: FRAME1
Standard link code:
SIMPLE TEXT LINK HTML CODE - Relative link:
Scrolling iFrame
<a href="id67.htm" target="FRAME1">Scrolling iFrame</a>
SIMPLE TEXT LINK HTML CODE - Absolute link:
Example 1
<a href="http://www.samisite.com/test-csb2nf/id58.htm" target="FRAME1">Example 1</a>
SIMPLE TEXT LINK HTML CODE - Absolute link with a floating tooltip:
Google
<A href="http://www.google.com" target="FRAME1" title="Google: the best search engine!">Google</A>
CSB/TRELLIX: Code can be inserted manually with Insert > HTML (webgem in Trellix)
My default placeholder is the webgem symbol.  Download it here if you would like to use it also.
These links (Rollovers, font change, color change, etc) are put in with Insert > HTML (webgem in Trellix)
Group links - See General Instructions
Individual links - The CNN code under FRAME1 uses this rollover code:
CNN
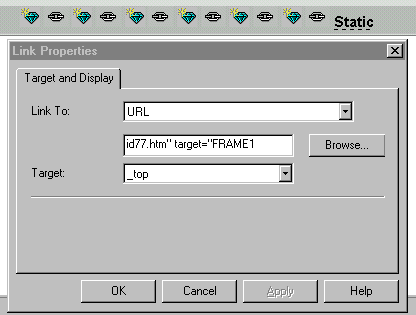
<a href="http://www.cnn.com/" target="FRAME1" onmouseover="this.style.background='#FFFF80'" onmouseout="this.style.background='#BBBBBB'">CNN</a>
(If using CSB3 or Trellix, disregard the _top setting shown in image below!)
HTML Button link code More instructions for this type of link is available here
Button code as seen under the Static iFrame FRAME1: (updated Feb 2011)
<STYLE type=text/css>
#rollbutton2 a {
color: #C0DCC0;
font-size:12px;
font-weight: bold;
text-decoration: none;
border:2px outset #D3D3D3;
background-color:#680098;
display: block;
width: 85px;
height: 19px;
padding: 0px;
}
#rollbutton2 a:hover {
background-color: #C0DCC0;
color:#680098;
padding-left: 3px;
border:2px inset #D3D3D3;
}
</STYLE>
<DIV id=rollbutton2>
<A href="http://www.google.com" target="FRAME1" title="Google:the best search engine!" onfocus="this.blur()"><center>Google</center></A>
<A href="http://www.langenberg.com/" target="FRAME1" title="Langenberg:the second best search engine" onfocus="this.blur()" target="_top"><center>Langenberg</center></A>
</DIV>
|